| Related Topics: | ||
A problem allows you to manage an issue by associating individual reported incidents with a single report that can be tracked and resolved. XFRACAS offers support for the 8D problem management process, the Six Sigma process and other four- to eight-step FRACAS processes such as IDOV, MDOV, etc. The number of steps involved in a problem will depend on the model used by your organization. For most steps, you can create actions to be performed to advance the process to the next step.
What's Changed? In previous versions, problems were called PRRs.
This topic provides instructions on common problem-related tasks, including:
For specific information on selected fields within the Problem page, please refer to the topic specific to the area (or step) of the Problem page.
Note: The fields that appear in the interface can be configured by the system administrator. The area topics are not intended to be a comprehensive guide to all possible fields. Instead, they provide additional information on some commonly used fields in cases where the field's purpose and/or functionality may not be readily apparent. For this reason, not all areas are covered in depth.
The Establish the Team area allows you to define the elements that control how the problem is handled (e.g., define the team, set closure dates, specify priority, etc.).
The Describe the Problem area allows you to specify information about the problem to be resolved (e.g., problem description, system information, etc.).
The Implement and Verify Containment Actions area allows you to define the containment information (e.g., containment description, action items, etc.).
The Identify and Verify Root Cause area allows you to define and verify the root cause.
The Choose and Verify Permanent Corrective Actions area choose and verify the corrective actions.
The Implement Permanent Corrective Actions area allows you to describe the steps taken to implement the corrective actions.
The Prevent Recurrence area allows you to define the steps taken to prevent recurrence.
The Congratulate the Team area allows you to recognize the team or add any additional comments.
To create a new problem report, choose Home > Create > Problem.
![]()
The Problem page will be displayed with a new problem record that you can define. Required fields are indicated with red borders. Portions of the page may be hidden; simply click any bar that contains an up or down arrow to hide or display that portion of the page.
The current entity will appear at the top of the page. You can select a different one from the drop-down list to create a problem report associated with that entity. Please note that the fields that appear in the Problem page may vary depending on the current entity.
The Problem page is made up of four to eight different areas, depending on the settings chosen by the system administrator, which take you through each step of the reporting process. When creating the problem report, you will enter the required information in the Establish the Team step, then choose Home > Problem > Create.
![]()
Upon creation, a unique problem number is automatically assigned by the system. This is displayed in the top left corner of the page and in the browser title bar. The record number will include the prefix for the entity that it is associated with (e.g., E1-37).
Although a team of users may work on a problem, one user must have the primary responsibility for each problem.
When you create the problem, you will be prompted to specify the owner of the problem in the Establish the Team area. The problem owner has primary responsibility for the problem.
Once you have created the problem, you can assign team members to work on it by clicking the Assign/Remove Members icon beside the Team Members field in the Establish the Team area. This will open the Assign Team Members utility, which allows you to assign and remove users to the team and specify their roles. Once you have assigned team members, the Team Members field will display the team members and their roles. Note that the names displayed are e-mail links. Clicking a name will open the Send E-mail utility.
You may find that multiple incidents are attributable to the same underlying issue. You can manage such issues by associating individual reported incidents with a problem that can be tracked and resolved. To associate an incident with the current problem, click the Assign/Remove Incidents link in the Associated Incident Reports table in the Describe the Problem area. The Assign Incidents to Problem utility will be displayed.
Depending on the settings chosen by the system administrator, the list may initially contain only currently associated incidents. To display all available incidents, click Filter without entering any criteria.
To filter the available incidents, enter a complete or partial Incident #, Responsible Part, Incident Status and/or Incident Category in the input boxes that appear above the corresponding columns and click Filter.
In the list of incidents, select the check box(es) next to the incident(s) that you want to associate with the current problem. To select all incidents in the list, select the check box in the header.
To remove incidents from the current problem, clear the check box(es) next to the selected incident(s).
Click Save to save the changes in the utility. Click Cancel to cancel any changes. Once you return to the Problem page, you will notice that the incident(s) associated with the current problem appear in the Associated Incident Reports table.
In much the same way that problems are used to manage related incident reports, projects can be used to manage related problems. To associate a project with the current problem, click the Assign/Remove Projects link in the Associated Projects table in the Describe the Problem area. The Assign Projects to Problem utility will be displayed. This utility works similarly to the Assign Incidents to Problem utility, described above.
In addition to entering more details, there are several tasks that are commonly performed in updating a problem.
Statuses allow users to add information about progress made on the problem.
Various steps of the problem may have status fields. To create a new status,
click the Add icon, ![]() , beside the Problem
Statuses field. The Status utility
will appear, allowing you to enter comments.
, beside the Problem
Statuses field. The Status utility
will appear, allowing you to enter comments.
Authorized users can assign actions (tasks) to help resolve the problem
and then track the progress on those actions. Various steps of the problem
may have associated actions. To create a new action, click the Add
icon, ![]() ,
beside the Actions field. The
Create Action utility will appear.
,
beside the Actions field. The
Create Action utility will appear.
Once you have created an action, you can click the action number in the Actions field to modify it.
Actions with attachments will be shown in the list with a paperclip icon.
As mentioned earlier, the number of steps involved in a problem will depend on the FRACAS process used by your organization. The 8D reporting process involves all eight steps supported by XFRACAS:
Choose the team for the 8D report
Describe the problem
Contain the problem
Define the root cause of the problem
Choose the corrective action for the problem
Implement the corrective action for the problem
Prevent recurrence of the problem
Recognize the team
The border surrounding the current step of the reporting process is highlighted in red. The border surrounding the completed steps will appear in green. To complete a given step, at minimum, the Completed By field and the Completed Date must be filled out, and the problem record saved. In addition, any of the steps 2 through 8 may allow or require a Failure Review Board (FRB) approval. If the FRB is optional for the step, the field does not have to be used, but if the FRB is set up the members must sign off before the step is considered complete. If the FRB is required for the step, the FRB must be set up and the members must sign off before the step is considered complete.
If the step has an FRB associated with it, the FRB Approved By area displays the reviewers who have been assigned to the FRB, their “user category” (i.e., the reviewer role they fulfill in this case) and the date, if any, they signed off on the decision to close the problem step. "N/A" indicates that the reviewer has not yet signed off on the closure of the current step. If the reviewer has reviewed the step and rejected closure, "Rejected" will appear in red. You can point to the word "Rejected" to see any comments on the rejection, or click the word to see the comments in a separate window.
If your name is in the list, you can check the Yes or No option to the right of your name to indicate your approval or disapproval of the decision to close the current step. If you select No, the Problem Closure Rejection utility will appear, which allows you to type comments for why you are rejecting closure of the current step. If you select Yes, the date when you approved the step closure will be displayed in the Sign-off Date column when you save the problem record.
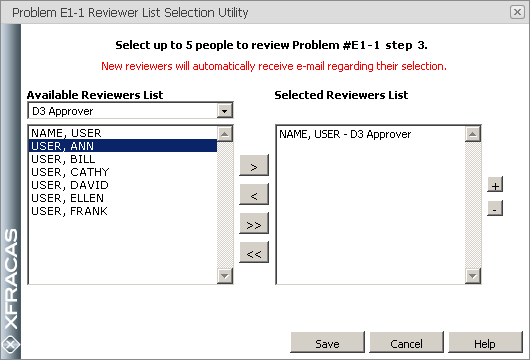
The Edit Reviewer List link opens the Problem Reviewer List Selection utility, which allows you to assign and remove the reviewers for the FRB.
 Click
here for more information on using the Problem Reviewer List Selection
utility.
Click
here for more information on using the Problem Reviewer List Selection
utility.
The View Reviewer History link opens the FRB Removed Reviewer History utility, which displays information on all removed reviewers, including their category, the date of removal, reason for removal and rejection comments.
Once the required number of steps in the problem have been completed, the Set Close Status field will appear in the final step. Selecting a closed status for the problem marks it as closed. The options in this list are controlled by the system administrator.
Depending on the settings chosen by the system administrator, a problem may not be able to be closed until all incidents associated with the problem are closed and/or all actions for the problem completed.
© 2006-2017. HBM Prenscia Inc. ALL RIGHTS RESERVED.