
The Resource Manager allows you to create, view, edit and delete Synthesis resources. It also helps you to trace where each resource is used, and to create global resources that are available to all projects in the database.
To open the Resource Manager, choose Project > Synthesis > Resource Manager.
![]()
To use the utility, choose the type of resource that you want to work with in the navigation panel on the left side of the window. A table that displays the resources of the selected type will be shown on the right side of the window.
Tip: When you need to create or edit a large number of resources, you can also use Synthesis APIs to import the data from an Excel file or other data source. For example, the URDExample_V10.xlsm file at C:\Users\Public\Documents\ReliaSoft\Examples10\API enables you to quickly create/update multiple URDs with some basic properties (models and corrective tasks). If you have the necessary software coding experience, you can expand this tool or create your own custom applications to meet specific needs.
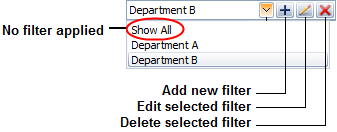
The Resource Manager can utilize the same resource filter that is available in many other locations throughout Synthesis desktop applications.

The Resource Manager offers the same filter, column configuration and grouping tools that are built in to other Synthesis utilities that use a similar grid (e.g., the Synthesis Explorer, Actions Explorer, etc.). For details about how to use each feature, see:
You can:
Create a new resource of the selected type by choosing Home > Edit > New.
![]()
To add multiple resources at the same time, specify the quantity in the Home > Batch Add > Number to Add field and then choose Home > Batch Add > Add Items. You will specify the properties for one of the new resources, and the additional resources will be duplicates of that. You can then edit each resource individually, or in BlockSim you can go to the Item Properties Table to edit them in a spreadsheet format.
Duplicate an existing resource by selecting the row in the table and choosing Home > Edit > Duplicate.
![]()
View or edit an existing resource by double-clicking the row in the table or by selecting the row and choosing Home > Edit > View.
![]()
Delete an existing resource by selecting the row in the table and choosing Home > Edit > Delete.
![]()
You cannot delete a resource that is currently being used in any other resource or analysis.
Note: A published model cannot be edited or deleted from the Resource Manager. If changes are needed, you must update the original analysis and then republish the model. If you wish to delete the model, you must first remove the association with the original analysis and also make sure the model is not being used. (See Publishing Models.)
With a single resource selected, you can choose Home > Actions > Trace Usage to open the Dependency Viewer, which provides information on where the resource is used and any additional resources that the currently selected resource itself uses.
![]()
If you need to know which resources are not currently being used (e.g., because you want to delete obsolete records), choose Administration > Selection > Show Only Unused.
![]()
As explained in Local, Global and Reference Resources, the availability of Synthesis resources for use is determined by their scope. Local resources are available only in the current project. Reference resources are available for any project within the database, depending on the user's permissions within the reference project. Global resources are available for use in any project in the database.
The far left column in the Resource Manager displays an icon that indicates whether each resource is local, global or a reference resource.
|
|
|
|
|
Local Resource |
Global Resource |
Reference Resource |
You can use the Home > Filter > [Show Local/Show Global/Show References] commands to toggle the types of resources shown in the Resource Manager.
To print the current view of the Resource Manager, choose Home > Edit > Print.
![]()
To send the contents of the Resource Manager to Excel, or to a built-in Synthesis Workbook or spreadsheet if that's available in the current application, choose Administration > Actions > Transfer Report.
![]()
You can send either the current item (i.e., the table for the currently displayed page) or the full report (i.e., the tables for all pages in the Resource Manager).
© 1992-2016. ReliaSoft Corporation. ALL RIGHTS RESERVED.
 |
E-mail Link |