
The Design tab of the design folio is used to define and then build an experiment design. When you build the design, its "plan" will be shown on the Data tab.
If you are working with a standard design folio, you will use the Design tab to select a design type, define responses/factors and choose additional settings for the whole design.
If you are working with a robust design folio, you will make these selections for each of the inner and outer arrays of the design.
If you are working with a mixture design folio, you will make these selections to specify the design for mixture factors and, if applicable, process factors.
After you create the folio, follow the steps outlined next to build a design from scratch.
Tip:
If you wish to use saved settings instead, choose Design
> Import/Export > Import Template or click the ![]() icon on the control panel.
After you import the settings, you can proceed to the last step to review
your settings and build the design. (See Importing/Exporting
Design Settings.)
icon on the control panel.
After you import the settings, you can proceed to the last step to review
your settings and build the design. (See Importing/Exporting
Design Settings.)
Choose the Design Type(s)
If you are working with a standard design folio, choose one design type for the experiment by clicking the Design Type header in the navigation panel on the left and choosing an option in the input panel on the right. If you're using a robust design folio, you need to select two design types (one under the Inner Array heading and another under the Outer Array heading).
When you first create a design folio, the current factor settings will change as required depending on the design you select. After you directly make changes to the factors, responses or additional settings, the factor settings will no longer change automatically, and the design types will be color-coded in green or red.
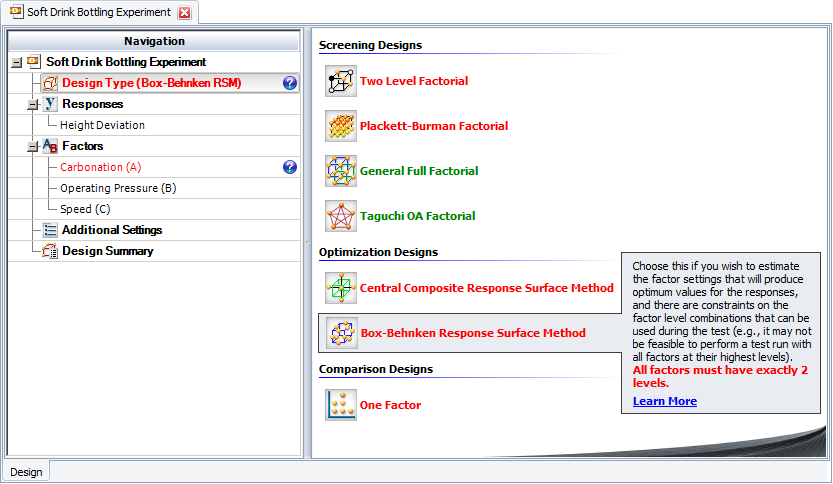
If a design is red, then one of the current factor settings is incompatible with it. When you select a red design type, the factor(s) it is incompatible with will become red as well. To find out why the setting is incompatible, read the design type's description. For example, the red text in the design description below says, "All factors must have exactly 2 levels," which indicates that the Carbonation factor (also shown in red) does not have the required number of levels for a Box-Behnken design.

Define the Response(s)
If you are using a standard design folio, you must configure the response(s) that will be measured in the experiment by selecting the response in the navigation panel and editing its properties in the input panel. (See Adding, Removing and Editing Responses.)
For robust design folios, default response properties will be used to build the design.
Define the Factor(s)
You can change the number of factors by clicking the Factors heading in the navigation panel and choosing an appropriate number in the input panel. You can then define individual factors by selecting the factor in the navigation panel and editing its properties. (See Adding, Deleting and Editing Factors.)
Specify Additional Settings
The options available when you click the Additional Settings heading will vary depending on which design type is currently selected. To see the settings for a particular design type, click a design below.
Screening Designs
Factorial Designs
Response Surface Method Designs
 Central
Composite Response Surface Method
 Box-Behnken
Response Surface Method
Mixture Designs
Rename the Folio
If you wish to rename the folio, click the heading at the very top of the navigation panel and edit the text in the Name field in the input panel. Alternatively, you can right-click the folio in the project explorer and choose Rename from the shortcut menu.
Review Your Settings and Build the Design
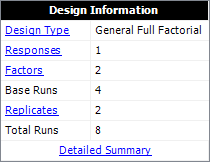
You can review some properties of your new design in the Design Information area of the control panel, as shown next.

In addition to the Design Type, Responses, Factors and Replicates you chose for the design, the following calculated values are shown:
Base Runs is determined by the number of factors, the number of levels for each factor and whether you are using a fractional design. For example, if your design is a full factorial design with 3 factors that each have 2 levels, then the number of base runs is 23, or 8. If the factors/levels are the same but you are using a fractional design that uses 1/2 of the runs required for a full design, then the number of base runs is 4 (i.e., 1/2 of the 8 required for the full design).
Total Runs is the total number of runs that are required for the experiment. This value is determined by the number of base runs, replicates, center points per block, axial points per block and other settings. For extreme vertex designs, this information will not be available until you have validated the constraints.
If you click any link in the first column of this table, you will be able to edit the relevant setting in the input panel. If you wish to see more detailed information about your current design settings, click the Detailed Summary link at the bottom of the table. The Design Summary will provide further information about the design's properties.
You can also use the Design Evaluation tool to help you determine whether a design with the current settings would, for example, be likely to detect the main effects and factorial interactions you are interested in. (See Design Evaluation.)
When you are ready to build the design, choose Design > General > Build Design or click the icon on the control panel.
![]()
This will create a new Data tab in the folio that will be used to enter and analyze response data.
© 1992-2016. ReliaSoft Corporation. ALL RIGHTS RESERVED.
 |
E-mail Link |