
| Related Topics: | ||
This topic describes some ways of manipulating items in the system hierarchy.
When you create a project, the first item is added automatically to the system hierarchy. To add more items, follow any of the instructions below. The new item will be added to the bottom of the list for the associated level.
To add a new top-level (system) item, choose System Hierarchy > Add > Add System.
![]()
To add a new item to the next level below a selected item, choose System Hierarchy > Add > Add Next Level Item.
![]()
To add a new item to the same level as a selected item, choose System Hierarchy > Add > Add Same Level Item.
![]()
To delete an item from the system hierarchy, select the item and press DELETE. The item will be deleted, along with all sub-items and all associated analyses and attachments. You can undo the last deletion only.
You can move items within the system hierarchy by dragging them to the desired location. When an item is moved, all associated analyses and attachments will also be moved. You can also move the items in the system hierarchy using any of the following instructions:
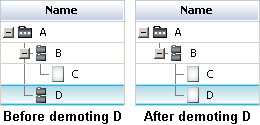
To move a selected item to the next higher or lower level, choose Home > Move Record > Promote or Demote. An item can be demoted only if there is another item on the same level and above the selected item that it can be demoted under.

To move an item up or down within its current level, choose Home > Move Record > Up or Down.
You can cut or copy items in the system hierarchy and paste them to the same project or to another project within the same database. (Please note that if you want to share items between different databases, you must use the import/export functionality.)
To cut/copy multiple items all at once, hold the CTRL key while clicking all the items you wish to select. To select multiple items that are adjacent, click the first item and then hold the SHIFT key while you click the last item. This will select all the items between the first and last.
You can then use the standard keyboard shortcuts for cut/copy (CTRL+X and CTRL+C) or you can choose Home > Clipboard > Cut or Copy. When an item is cut or copied, all next-level items also will be cut or copied, along with any analyses and attachments. You can then paste the item to the desired level in the system hierarchy.
To paste the item as a dependent to the selected system, choose Home > Clipboard > Paste or press CTRL+V.
To paste the item as a system, choose Home > Clipboard > Paste > Paste as Top Level.
You also can choose Home > Clipboard > Paste > Paste Special to open the Paste Special window, which allows you to choose the level at which the cut or copied item will be pasted to the system hierarchy, and whether dependents and/or analyses will be pasted along with it.
If an item is cut or copied and then deleted from the project, the copied data will also be deleted from the Clipboard. In addition, once an item has been cut or copied, any edits that are made to the original will also be applied to its copy in the Clipboard. Also note that you will not be able to cut or copy an item in a project that is locked by another user.
Tip: You can choose Home > Clipboard > Copy Active View to copy the currently visible contents of the System panel or Analysis panel to the Clipboard as a graphic that can be pasted into other applications. The entire visible area within the active panel will be copied but any information that is not currently visible will be excluded.
© 1992-2015. ReliaSoft Corporation. ALL RIGHTS RESERVED.