
The System Hierarchy panel of the prediction folio is where you define the assemblies and components that you wish to analyze. It uses a tree-based structure of blocks and components to represent the system configuration. To build a system configuration, you can either manually define all the blocks and components, or you can import some or all of the data.
This topic focuses on the tools available to build and manage the system configuration manually. For information on importing component/assembly data from another analysis or from a part library, see Import Predefined Components. For information on importing an existing system configuration from an Excel file or delimited text file, see Import Bill of Materials.
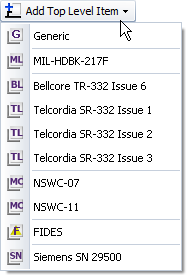
In Lambda Predict, a standard item represents a system or assembly that is analyzed using a particular reliability prediction standard (except in the case of generic items, which are discussed below). The most common way to add a standard item to a prediction folio is to choose System Hierarchy > Add Item > Add Top Level Item, and then select the prediction standard you wish to use. (For MIL-217 parts count analysis, see Using the Parts Count Method.)
Similar commands will also be available when you have selected another standard item and choose Add Same Level Item, or when you have selected a generic standard item and choose Add Next Level Item.
Note: Only the items for the prediction standards that are included in your Lambda Predict license will be displayed. To expand your license, please contact ReliaSoft. (To view the contact information in Lambda Predict, choose File > Help, and then select the Contact Global Support Center link.)
The generic standard item ![]() provides a way to combine the results from different prediction standards.
For example, you can use a generic item to analyze an electromechanical
system, where the mechanical components are analyzed with the NSWC standard
and the electronic components are analyzed with the Bellcore standard.
provides a way to combine the results from different prediction standards.
For example, you can use a generic item to analyze an electromechanical
system, where the mechanical components are analyzed with the NSWC standard
and the electronic components are analyzed with the Bellcore standard.

In such cases, the failure rates calculated by each prediction standard will be displayed in the units that are typical for that standard, while the combined results for the generic item are automatically converted to the units you specify. You can make this units selection on the Other Settings page of the Application Setup.
For example, in the picture above, the NSWC failure rate is shown in FPMH and the Bellcore failure rate is shown in FITS. Since the user has selected to show generic item results in FPMH, Lambda Predict automatically converts the FITS result (~39 failures per million hours = ~0.039 failures per billion hours) in order to calculate the combined results for both types of components (~4.4381 + ~0.039 = ~4.4771 FPMH).
A component represents an individual device at the lowest level in the system configuration, such as a fuse, capacitor, spring, etc., while a block can represent any type of assembly. Each block or component has properties that are based on the prediction standard you are working with.
To add a block or component in the next level under a selected item, choose System Hierarchy > Add Item > Add Next Level Item.
![]()
To add a block or component to the same level as the selected item, choose System Hierarchy > Add Item > Add Same Level Item.
![]()
There are four choices of items you can add:
![]() Block adds a generic block
that can be used to group components and/or other blocks into any type
of assembly.
Block adds a generic block
that can be used to group components and/or other blocks into any type
of assembly.
![]() Component/Block opens the
Select a Component window, which
displays a list of all the components and blocks that apply to the prediction
standard you are working with.
Component/Block opens the
Select a Component window, which
displays a list of all the components and blocks that apply to the prediction
standard you are working with.
![]() Import from PartLibraries.org
allows you to search for and import components from the web-based PartLibraries.org
database. This library provides access to the integrated circuit (IC)
component definitions published in MIL-M-38510,
the electronic component failure rates published in EPRD-97
(Electronic Parts Reliability Data) and the mechanical, electrical and
electromechanical component failure rates published in NPRD-95
(Nonelectronic Parts Reliability Data), as well as access to more
than 300,000 commercial components with reliability prediction
parameters predefined based on the published manufacturer spec sheets.
(See Importing from PartLibraries.org.)
Import from PartLibraries.org
allows you to search for and import components from the web-based PartLibraries.org
database. This library provides access to the integrated circuit (IC)
component definitions published in MIL-M-38510,
the electronic component failure rates published in EPRD-97
(Electronic Parts Reliability Data) and the mechanical, electrical and
electromechanical component failure rates published in NPRD-95
(Nonelectronic Parts Reliability Data), as well as access to more
than 300,000 commercial components with reliability prediction
parameters predefined based on the published manufacturer spec sheets.
(See Importing from PartLibraries.org.)
![]() Import Local Components
allows you to import any component saved in the current folio, current
database, another database or custom library file. (See Importing
Local Components.)
Import Local Components
allows you to import any component saved in the current folio, current
database, another database or custom library file. (See Importing
Local Components.)
You can replace any existing component in the system hierarchy with a different component. Doing so retains all the general properties, such as name, part number, description, etc., that you may have already defined for the component. To replace a component, select the component in the system hierarchy and choose Prediction > Component > Change Type.
![]()
In the Select a Component window, select the component you wish to use and click OK. The new component replaces the currently selected item, and the prediction results are updated to account for the failure rate of the new item.
To delete an item from the system hierarchy, select the item and press DELETE. The item will be deleted, along with all its sub-items and associated attachments. There is no undo for deleting an item in the system hierarchy.
You can also delete an item by selecting it in the system hierarchy and choosing Home > Hierarchy > Delete, or by right-clicking the item and choosing Delete on the shortcut menu.
You can move items within the system hierarchy by dragging them to the desired location. When you move a block that has sub-items, all its sub-items will also be moved.
You can also move an item up or down its current position by selecting the item and choosing Home > Hierarchy > Move Up or Move Down, or by right-clicking the item and choosing those options on the shortcut menu.
You can cut or copy items in the system hierarchy and paste them to the same project or to another project within the same database. (Please note that if you want to share items between different databases, you must use the Import or Export Wizard. See Import, Export and Data Conversion)
You can use the standard keyboard shortcuts for cut/copy (CTRL+X or CTRL+C) or you can choose Home > Clipboard > Cut or Copy. When an item is cut or copied, all its sub-items will also be cut or copied. You can then paste the item to the desired level in the hierarchy:
Choose Home > Clipboard > Paste > Paste as Same Level Item or press CTRL+V.
Choose Home > Clipboard > Paste > Paste as Next Level Item or press CTRL+SHIFT+V.
Note that you will not be able to cut or copy an item in a project that is locked by another user.
© 1992-2019. HBM Prenscia Inc. ALL RIGHTS RESERVED.
| E-mail Link |