
Lambda Predict includes a utility that allows you to define your own derating requirements or combine models from any of the published standards with your own. These custom standards are stored within the database, and they are available for any project that you open or create in the database.
In a non-secure database, there are two ways you can create/edit custom derating standards:
You can open the Apply Derating Standard window and create a new standard by clicking the Add ![]() button, or edit an existing custom standard by selecting it from the list and clicking the Edit
button, or edit an existing custom standard by selecting it from the list and clicking the Edit ![]() button.
button.
You can manage all the custom derating standards available in the database by choosing File > Manage Repository > Custom Derating Standards Manager.
![]()
In the Custom Derating Standards Manager window, use the Add ![]() or Edit
or Edit ![]() buttons to create/edit the custom standards, or use the Delete
buttons to create/edit the custom standards, or use the Delete ![]() button to remove the selected standard from the database. There is no undo for delete. You can also use the Import
button to remove the selected standard from the database. There is no undo for delete. You can also use the Import ![]() or Export
or Export ![]() buttons to import/export custom derating standards to another database. (See Importing and Exporting Custom Derating Standards.)
buttons to import/export custom derating standards to another database. (See Importing and Exporting Custom Derating Standards.)
In a secure database, the ability to create/edit custom standards is restricted to users with the "Manage Lambda Predict repository settings" permission. All other users that do not have the permission can use, but not modify, any existing custom standard stored in the database.
When you add or edit a custom derating standard, the Custom Derating Standard window appears. This window allows you to edit the name and description of the custom standard, as well as manage its derating models.
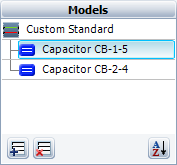
The Models area on the left side of the window displays a tree-like structure with the name of the custom standard in the heading followed by the names of the derating models that have been added to the standard, as shown in the following example.

You can add a new derating model to the standard by clicking the Add Model icon ![]() or delete an existing model by clicking the Delete Model icon
or delete an existing model by clicking the Delete Model icon ![]() . The Sort icon
. The Sort icon ![]() allows you to alphabetically sort the model names.
allows you to alphabetically sort the model names.
Each custom derating standard can contain user-defined models (where you define the nominal and worst case curves for the component) and/or models that have been defined in any of the published derating standards that are supported by the software (where the nominal and worst case curves are set automatically from the standard and can’t be edited).
In the Model Name field, enter a name for the model, if desired.
In the Derating Model drop-down list, choose User-Defined.
Use the Model Type, Category, Subtype and Style drop-down lists to specify which component the model applies to. Note that:
If the component has any subtypes (e.g., a Bellcore analog IC may be bipolar, CMOS or NMOS), you can select the Include all subtypes check box to apply your model to all subtypes of that component.
If the component has different styles (e.g., a Bellcore analog IC may have a hermetic or non-hermetic packaging style), you can select the Include all styles check box to apply your model to all styles of that component.
In the Stress drop-down list, choose a stress type, and then use the Nominal Case and Worst Case tables on the right side of the window to enter the derating requirements for that stress. Repeat the process until you have defined curves for all of the stress types that are applicable for this component.
Use the Description and Notes fields to enter any additional information about the model, if desired.
To add a model from a published derating standard to your custom standard, select any of the published derating standards in the Derating Model drop-down list, and then use the Model Type, Category, Subtype and Style drop-down lists to specify which component you wish to add. The Nominal Case and Worst Case tables on the right side of the window will show the derating requirements of the component as defined by the selected published standard. These values are read-only.
Tip: You can also use the Copy ![]() and Paste
and Paste ![]() icons in the tables to copy the values, paste the data into a table for a user-defined model and then modify the values as needed.
icons in the tables to copy the values, paste the data into a table for a user-defined model and then modify the values as needed.
© 1992-2017. HBM Prenscia Inc. ALL RIGHTS RESERVED.
 |
E-mail Link |