
In the spreadsheet module for Synthesis Workbooks, you can create variable names that reference specific spreadsheet cells. These names can then be used in any formula or function within the same workbook.
Note that the following examples are for Weibull++. Similar functionality is available in ALTA, RGA, BlockSim and DOE++.
The following formula will return the reliability obtained from a specific Weibull++ standard folio data sheet for the time value that is currently entered in cell B5 of the spreadsheet:
=RELIABILITY(“Weibull!Bulb!Data1!”$B$5))
Alternatively, if you want to create a shorter function expression that may be easier to build and interpret, you can use defined variable names instead. For example, if you use the name “OpTime” for the cell that contains the operating time, the function will be:
=RELIABILITY(“Weibull!Bulb!Data1!”OpTime)
The first character of a name must be a letter or an underscore. The remaining characters can be letters, numbers, periods and underscores. Names are not case sensitive.
Spaces are not allowed as part of a name. An underscore ( _ ) or period ( . ) can be used as a word separator.
Symbols, except for underscores ( _ ), periods ( . ) and backslashes ( \ ), aren't allowed.
To view and manage the defined names in the spreadsheet module of a Synthesis Workbook, choose Formula >Defined Names > Name Manager. From here you can:
Click New to create a name. (See Using the New Name Window below.)
Select a name and click Edit.
Select a name and click Delete.
You can use any of the following methods to define a name:
A fast way to create a name for a cell is to use the Name box. Select the cell or range of cells, then click the Name box and type a name. Press Enter to create the name.

Using the New Name window is most flexible option for creating names.
Select a cell or range of cells.
Open the New Names window by choosing Formulas > Defined Names > Define Name.
![]()
You can also open this window by choosing Formulas > Defined Names > Name Manager and clicking New.
Type a name into the Name field. In the Scope drop-down list, choose whether this name will be used for the entire workbook or a specific sheet. The Comment field is optional.

The selected cell/range will already be defined in the Refers to field, but you can click into the spreadsheet and select different cells, if desired.
Click OK to save the changes.
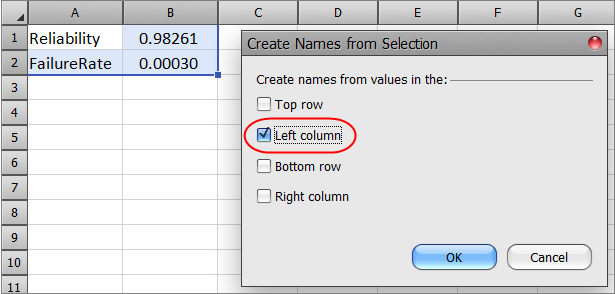
If the fields are already labeled in the spreadsheet, you can use them to create names.
Select the cells of interest (including the row or column labels), then select Create from Selection.
![]()
In the window, select the location of the labels. Click OK.

© 1992-2016. ReliaSoft Corporation. ALL RIGHTS RESERVED.
 |
E-mail Link |