
| Related Topics: | ||
The Item Properties Table, accessed by choosing Project > Data Management > Item Properties Table, allows you to view and/or edit the properties of the blocks in the diagrams and the resources within the current project.
![]()
This provides you with another way of viewing and editing properties without having to open the properties windows for each item. Any changes made to properties in the Item Properties Table will be applied to the corresponding properties window and any changes made to properties in a properties window will be applied to the Item Properties Table.
The Item Properties Table consists of a navigation panel on the left side of the window and the table area on the right side of the window. The navigation panel contains five pages that allow access to all of the RBDs, fault trees, phase diagrams, maintenance templates and other resources in the project. In addition, a Columns page is available that displays a list of available columns that can be shown in the table.
The columns in the table will vary depending on the type of item you are working with. For instance, the table for a reliability block diagram shows the Block Name, Display Name, Universal Reliability Definition and Comments columns by default. The table for universal reliability definitions shows the URD Name, Failure Model, Corrective Task, Scheduled Tasks and Comments columns. However, you can specify which columns will appear in the table using the Column Chooser.
To edit the information for the blocks or resources, click inside a cell and enter the corresponding information. To accept your input, click outside the cell. You can also press TAB to accept the input and move the focus to the next cell to the right or ENTER to accept the input and move the focus to the next cell down.
You can also use standard cut, copy, paste and clear commands within the table, including when you have multiple cells selected. The number of items that can be selected at once is limited by the value in the Administration > Selection > Max Selection field.
Some columns, such as Start Age and Duty Cycle, require numerical inputs; if the input must be within a certain range, BlockSim will check that your input meets the requirement and, if it does not, will show a message explaining the requirement. Other columns require specialized types of input; for example, the URD column for blocks requires that you specify a URD that exists in the project, while the Item Operates Even if System Down column requires a yes/no answer. These columns provide a drop-down list of valid choices. To edit the Comments column, double-click inside the cell to open an input box.
If the property does not apply to the corresponding block or resource, “N/A” will appear in the column and the cell will have a gray background. Properties that cannot be edited via the Item Properties Table, such as the block name, will also have a gray background.
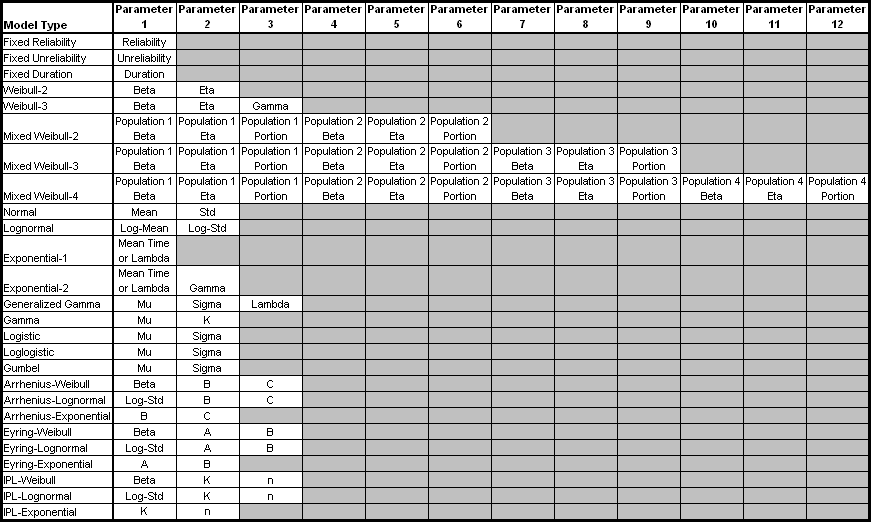
IMPORTANT: If you change the information in one column, it may affect the information required in another column. For example, if you are editing a model and you change the Model Type column from “Weibull-2” to “Weibull-3,” then the Parameter 3 column will change from “N/A” to requiring a numerical input for the third parameter for the Weibull distribution (i.e., gamma).
Models created by publishing results from an analysis in a Synthesis-enabled application cannot be edited in the Item Properties Table. To edit a model that was published from an analysis, you must return to the original data source, make the necessary changes, recalculate and republish the model.
Since the required parameters for a model will vary depending on the model type, the way you use the parameter columns in the Item Properties Table will vary. The parameter columns in the Item Properties Table for each model type are presented in the table shown next.

To print the contents of the Item Properties Table, choose Home > Edit > Print.
![]()
You can send the contents of the Item Properties Table to an analysis workbook or to Excel by choosing Administration > Actions > Transfer Report.
![]()
In the Transfer Report window that appears, you can select to send either the current item (i.e., the table for the currently displayed page) or the full report (i.e., the tables for all pages in the Item Properties Table) to an analysis workbook or to Excel. If you transfer the full report, each table will appear on a new tab in the analysis workbook or the Excel workbook. If you send data to Excel, you will be prompted for a filename and location. The Excel file will open automatically if the software is installed on your computer.
© 1992-2013. ReliaSoft Corporation. ALL RIGHTS RESERVED.