
| Related Topics: | ||
When you click the Repair or Replace Parts link on the Incident page, the Repair or Replace Parts utility allows you to record information about a part that was repaired, replaced, removed or found to be failed due to the incident.
If a system serial number has been entered for the incident, the left panel shows all parts currently on the system, as well as parts that have been removed in the past (these are identified with the removal date in brackets, e.g., "[04/11/2017]").
If a part number has been entered, it shows the generic part template.
If a serial or part number has not been entered, click the Find Template icon to select the generic part template that contains the part you want to record data for.
![]()
As an example, the following picture show a simple serialized configuration in which Part A (SN:555555) was replaced on April 11th with a new part of the same type (SN:888888). The right panel shows the details for the part that is currently selected (Part C, SN:777777).
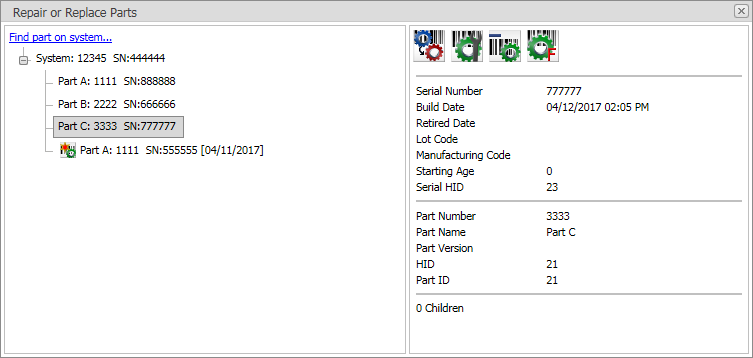
After selecting a part in the left panel, click one of the icons at the top of the right panel. The required information depends on the action that was taken.
![]() Replace Part
indicates that the part was removed from the system and replaced with
a different one. You must enter details for both the "old" and
the "new" part.
Replace Part
indicates that the part was removed from the system and replaced with
a different one. You must enter details for both the "old" and
the "new" part.
![]() Repair Part
indicates that the part was restored and remains in the system. You only
have to specify the failure type, but you can also record "Run Hours"
if the part's age at the time of the incident was different than the system's.
Repair Part
indicates that the part was restored and remains in the system. You only
have to specify the failure type, but you can also record "Run Hours"
if the part's age at the time of the incident was different than the system's.
![]() Remove Part
indicates that the part was removed from the system, but does not record
information about the replacement part. You can only specify the failure
type. This is only used if the part was failed. If you need to remove
a part that was not failed (e.g., because the configuration was entered
incorrectly), use the admin System > Serialized page instead.
Remove Part
indicates that the part was removed from the system, but does not record
information about the replacement part. You can only specify the failure
type. This is only used if the part was failed. If you need to remove
a part that was not failed (e.g., because the configuration was entered
incorrectly), use the admin System > Serialized page instead.
![]() Mark Part As Failed
indicates that the part was found to be failed due to the incident, but
you don't yet know how it should be recorded. When the information is
available, you can select the part again and change it to Replace, Repair
or Remove.
Mark Part As Failed
indicates that the part was found to be failed due to the incident, but
you don't yet know how it should be recorded. When the information is
available, you can select the part again and change it to Replace, Repair
or Remove.
The Failure Type is always required. Together with the incident category, it determines how the data are extracted for reliability data analysis.
Like the incident category, a failure type may be "chargeable" (e.g., "Primary Failure") or "non-chargeable" (e.g., "Primary Suspension" or "Collateral Failure").
If both the incident category and failure type are "chargeable," then the incident is considered to be a failure (F) for that part number. If either or both fields are set to "non-chargeable," then the incident is considered to be a suspension (S) for that part number.
Incident Category |
Failure Type |
Data Classification for Reliability Analysis |
Chargeable |
Chargeable |
Failure |
Chargeable |
Non-Chargeable |
Suspension |
Non-Chargeable |
Chargeable |
Suspension |
Non-Chargeable |
Non-Chargeable |
Suspension |
If you replace, repair or mark a part as failed, you can enter the time/usage for that part (e.g., "Run Hours," "Number of Starts" or "kw Run Hours") if it is different than the time/usage for the system.
If you don't enter a value, this will be set automatically based on the system's time/usage metric(s) in the System/Component Information area (and the part's starting age on the system).
If you replace or mark a part as failed, you can select the Part Disposition from a drop-down list. This indicates what you did with the part that was removed from the system (e.g., "Send to Engineering," "Scrap," "Return to Supplier," etc.).
If you replace a part in a serialized system, you can enter the Starting Age of the replacement part (e.g., "Run Hours," "Number of Starts" or "kw Run Hours") if it had already accumulated age before being added to the system (i.e., replacement with a "used" part).
If you extract the data to Weibull++ or RGA for reliability analysis, the starting age may be added to the part's time on the system to estimate the part's time/usage. (For example, if the part had a starting age of 100 hours when it was added to the system, the system runs for 200 hours before the next failure and you have not directly specified the part's time/usage, we assume it is 300 hours.)
For serialized incidents only, if you are replacing an assembly comprised of other parts, you can enter the replacement for each dependent ("child") part separately, or you can replace the assembly and select the Copy all children of replaced part check box.
Note that children that are copied will not have serial numbers; those can be entered manually via the administrative Serialized page or the Add/Modify Parts link.
You can use the Initial Failure Analysis field in the incident to record a summary of the analysis that was performed in the field to determine which parts to repair or replace. In addition, if you want to create a more detailed failure analysis report for a particular part after it is returned, click the New link in the table in the Incident page. If a report already exists for a part, the link will display the record ID instead.
© 1992-2018. HBM Prenscia Inc. ALL RIGHTS RESERVED.
 |
E-mail Link |