
In Weibull++/ALTA and RGA, it is easy to import data from any of the following file types into a folio.
Excel files (*.xls, *.xlsx)
Tab, comma, space and semicolon delimited files (*.txt, *.csv, *.prn, *.smc)
Tip: Other Synthesis applications use different tools for importing/exporting via Excel (i.e., for importing Bill of Materials data in Lambda Predict and failure mode data in Xfmea/RCM++/RBI and MPC). For more information about those features, please consult the documentation for each particular application.
First, open the project that you want to import into and choose Project > Management > Import/Export.
![]() or
or ![]()
In the wizard, choose Other file and click OK.
Browse for the file you wish to import from and click Open. Note that:
In DOE design folios, the data will be copied into a new free form folio, where you can then designate columns for factors and responses and analyze the data. If you are importing from an Excel file that has multiple worksheets, the sheet that was active the last time the file was opened will be used.
In Weibull++/ALTA and RGA, you will need to specify which data will be imported and how it will be mapped to the columns in the particular type of data folio. The rest of this topic describes how to map the data for import into a Weibull++, ALTA or RGA data folio. This includes:
The left side of the utility displays the data from the Excel or delimited text file that is currently selected. If you wish to open a different source file, click Open.
![]()
If you are importing from an Excel file that has multiple worksheets, use the tabs at the bottom of the window to view and set the import preferences for each sheet.
Use the options at the top of the control panel for each sheet to specify whether the data will be imported.
Do not import sheet: The control panel will not contain any other options and the data will not be imported.
Import sheet: The control panel displays the options you need to either manually map the columns or use a template to automatically apply the same mapping that was used for another file.
If you are not using a template, or if you need to modify the settings after an import template has been applied, do the following:
Use the Data Type drop-down list to specify which type of folio to import into. This can be different for each sheet, and it determines which options will be available in the rest of the control panel.
Click inside each column that you wish to import and then click the corresponding button in the control panel to map it to a column in the data folio. This updates the column heading and maps the data to a column in the data folio.
If the heading displays a letter, the data in that column will not be imported.
If the heading displays a name, the data will be imported to the column associated with that name.
To remove the column mapping, click inside the column and click the corresponding button again.
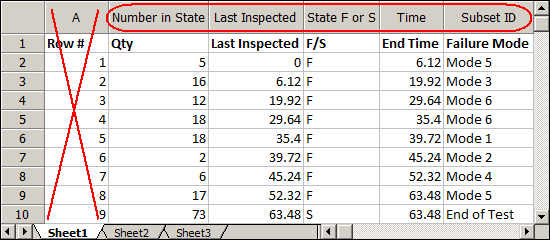
As an example, the following picture shows data that will be imported into a Weibull++ life data folio. Column A will not be imported. The rest of the data has been assigned to columns that are used in the folios.
If you are importing to an ALTA life-stress data folio, use the Number of Stresses field to specify how many stress columns will be created in the new folio (maximum = 8). Note that:
If you enter a value that is less than the number of columns that were mapped with the Stress button, the "extra" stress column data will not be imported.
If the number is greater, the additional stress columns will be created in the new folio and you can enter the data later.
If the source file contains column headings or other introductory material that should not be imported, use the Start from Row field to specify where the actual data begins. For example, in the picture above, the first row contains heading labels so the data import should begin from Row 2.
If you will be importing data from multiple files that have the same structure, you can use saved template files (*.waim in Weibull++/ALTA or *.rgaim in RGA) to automatically map the columns for all other similar files that you need to import from.
By default, template files will be stored at C:\Users\<username>\AppData\Roaming\ReliaSoft\<application>\Import Templates. This directory determines which templates will be displayed in the Import Template drop-down list in the control panel. It also sets the default path for saving any new templates you create.
If you want to access templates from a different location, click the Import Template Directory button at the top of the window and select a different folder.
Open a data file and use the control panel buttons to map the columns.
Click the Save icon in the Import Template area on the control panel.
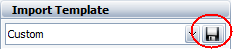
Specify a name and click Save.
Open the data file and select Import sheet to display the rest of the control panel options.
Make sure the Import Template Directory is set to the folder that contains the applicable template file(s).
Use the drop-down list in the Import Template area to select the template you want to apply.
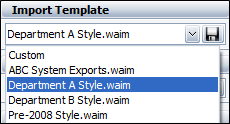
The utility will automatically assign the column mappings defined in the template. If desired, you can use the control panel to make further adjustments before import.
When you are satisfied with the mapping, click Import to create the new folio.
![]()
Tip: If you make adjustments after applying the template, you have the option to click Save in the Import Template area to either replace the existing template, or create a new template with a different name.
When you are ready to import the data, click the Import button.
![]()
By default, the application will import the data into a new folio. The status bar will display "Import into New Folio," as shown in the following example.

If you prefer to import into an existing folio instead, click the Import to Existing Folio button and choose one of the available folios. When you return to the import window, the status bar will now display the name of the selected folio, as shown in the next example.

© 1992-2017. HBM Prenscia Inc. ALL RIGHTS RESERVED.
 |
E-mail Link |