

| Related Topics: | ||
In table-based interfaces such as the Resource Manager, BlockSim's Item Properties Table and the Reliability Data Warehouse interfaces, there are several ways to find and filter data. Each of these tools can be used separately, or in conjunction with the others.
The Auto Filter row appears by default immediately below the column headers. Enter text in any cell in this row to display only those items that start with matching text in that field.
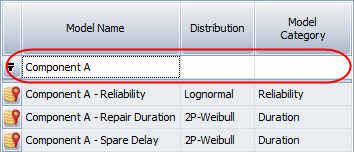
You can hide or show the Auto Filter row by choosing Home > Filter > Display Auto Filter Row or by right-clicking any column header and choosing [Hide/Show] Auto Filter Row.
![]()
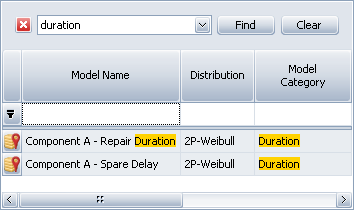
The Find panel, which is hidden by default, allows you to search for specific text in any record property. Right-click any column header and choose Show Find Panel to display the panel above the column headers.
Enter text in the field and click Find to filter the items displayed in the table and highlight the matching text. You can click Clear to remove the filter. To close the panel, click the X or right-click any column header and choose Hide Find Panel.
The Advanced Filters functionality is always enabled in the XFRACAS to RDW interface and in the RDW to Folio window. In the Resource Manager and the Item Properties Table, you can enable it by choosing Home > Filter > Enable Advanced Filters.
![]()
When advanced filters are enabled, a Filter icon will appear when you point to any column header in the table.
![]()
Click this icon to see a drop-down list of filters that you can apply for the currently selected column. These filters are automatically generated based on the values that currently exist in the column. For example, if you have reliability, duration and cost models in the project, those categories will automatically be available from the Model Category drop-down list.
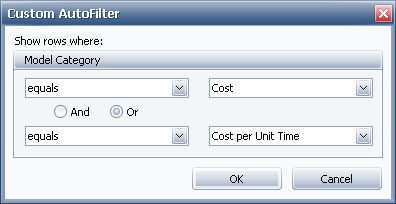
If no automatically generated filters are available or if you want to specify more than one possible value, you can choose (Custom) to open the Custom AutoFilter window, which allows you to specify two filter criteria for the property, in either an "and" or an "or" relationship. For instance, the window shown next will filter the available models to show only the cost and cost per unit time models.
You can apply multiple filters in these ways to narrow the resources in the table as needed. Each column that has a filter applied will continue to display the Filter icon in the column header. The filters that you apply will appear at the bottom of the table, as shown next.
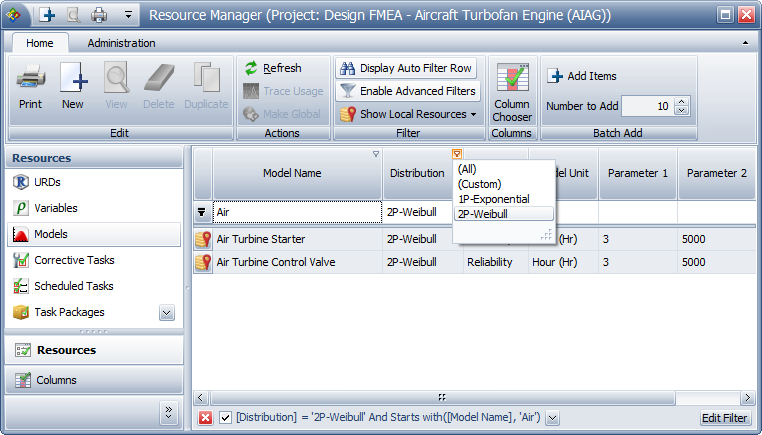
Click the check box to apply or remove the set of filters. Click the X to delete the set of filters entirely. To delete a single filter from the set, right-click the relevant column header and choose Clear Filter.
When you have Advanced Filters enabled, you can edit the filters by clicking the Edit Filter button in the filter display or by right-clicking any column header and choosing Filter Editor. Note that this window also includes filters applied in the Auto Filter row.
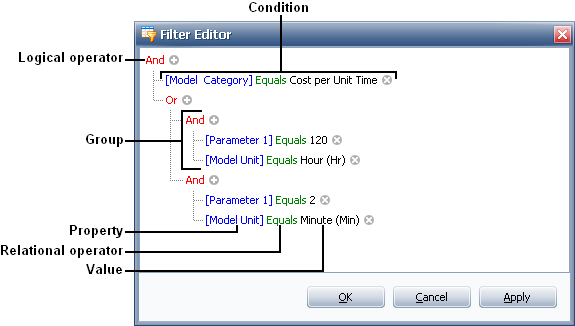
Click any colored element in the window to view a drop-down list of available values.
Click a red label if you want to:
change the logical operator (And, Or, Not And, Not Or)
remove the group
add a sub-group
clear the entire filter
Use the + and x icons to add or remove conditions within an existing group.
Click a blue label if you want to change the property (e.g., Model Name, Created By, etc.).
Click a green label if you want to change the relational operator (e.g., Equals, Contains, Begins with, etc.).
For example, the filter shown above will display only cost per unit time models in which the rate equals either $120 per hour or $2 per minute.
© 1992-2015. ReliaSoft Corporation. ALL RIGHTS RESERVED.