
| Related Topics: | ||
The FMEA > RPNs page of the interface style displays a list of all RPN-related properties/metrics that can be displayed for FMEAs in the project. This works like the other properties pages except:
An additional column, Short Display Name, specifies the abbreviation that will be used in some locations within the interface, plots and/or report output where the full display name will not fit.
The metrics can be enabled only if the applicable rating scales are enabled. For example, since the Initial RPN metric is calculated based on the Initial Severity x Initial Occurrence x Initial Detection, if you disable the Initial Severity property, then Initial RPN will be disabled automatically. Likewise, if you enable the Initial RPN, then all of the ratings required to calculate that metric will be enabled also.
The Initial Risk Ranking and Revised Risk Ranking properties can be enabled only if you have specified a risk ranking logic for the interface style as described below.
Two areas at the bottom of the page allow you to configure the logic that will be employed when a user turns on the Highlight Priority feature (FMEA > Tools > Highlight Priority) for FMEAs within the project.
In the Highlight Priority Based on area, choose a rating or metric from the drop-down list and then specify the thresholds for high priority and low priority. In the Select Highlight Colors area, choose the colors that will be used to highlight the records in the FMEA that match the criteria for high, medium or low priority. For example, consider the settings shown below:

When you are working with an FMEA in a project with these settings defined and choose FMEA > Tools > Highlight Priority:
![]()
Causes with an RPN equal to or greater than 300 will be highlighted with a red background color.
Causes with an RPN from 31 to 299 will be highlighted with a yellow background color.
Causes with an RPN equal to or less than 30 will be highlighted with a green background color.
Causes that do not have a calculated RPN will not be highlighted.
The options in the drop-down list will vary depending on which ratings and metrics have been enabled in the properties table. For example, if you have disabled the Initial RPN and Revised RPN properties, the RPN metric will not appear in the drop-down list for priority highlights.
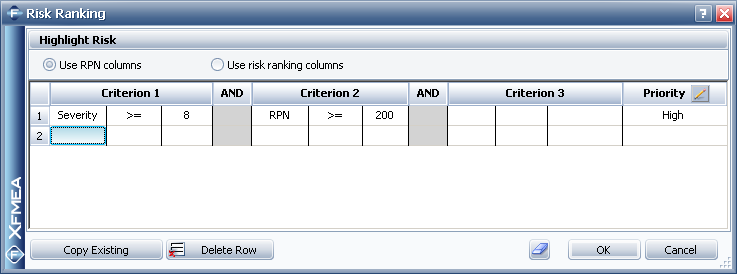
Xfmea also allows you to define a more complex logic for the priority highlights functionality. To use this feature, choose Risk Ranking from the drop-down list and then click the Risk Ranking Logic button to open a window like the one shown next.

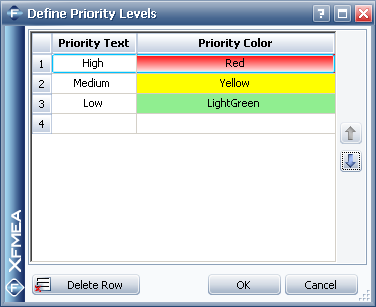
The first step is to define the priority levels that will be used for the configurable risk ranking logic. This can be the same three levels that are available for the basic priority highlights functionality (high, medium and low) or it can be configured to meet the specific categories used by your organization. For example, this could be two levels (such as Action Required and No Action Required) or four levels (such as Critical, High, Medium and Low), and so on.
To define the levels and the color associated with each level, click the Edit icon in the header of the Priority column to open a window like the one shown next.

(Depending on the size of the Risk Ranking window, it may be necessary to scroll all the way to the right in order for the Priority column to be visible.)
To edit the label for an existing level, click inside the cell in the Priority Text column and edit the text.
To add a new level to the bottom of the list, click inside the last row and type the label in the Priority Text column.
To delete a level, select the row and click Delete Row. There is no undo for delete.
To move an existing level up or down in the list, select the row and click the up or down icon.
To set the colors, click any of the cells in the Priority Color column and choose a new color from the Custom, Web or System palette.
Click OK to save your changes.
The next step is to determine where the highlight colors will be applied in the interface and reports. If you want to apply the highlight color to the RPN-related columns that already are displayed in the FMEA hierarchy view, worksheet and reports, choose the Use RPN columns option at the top of the window. If you want to add new columns to display the results of the more complex risk ranking logic, choose the Use risk ranking columns option.
Tip: When the Use risk ranking columns option is selected, the Initial Risk Ranking and Risk Ranking properties will become enabled in the table on the RPNs page of the Interface Style. When you close the Risk Ranking window and return to the RPNs page, you can customize these columns by editing the text in the Display Name, Short Display Name and Tooltips columns.
The last step is to define the logic that will be used to assign causes from the FMEA to the priority levels that you have defined. This can be based on any combination of the ratings and/or metrics that have been enabled in the interface style. You can create as many rows in the table as you need to define the prioritization logic used by your organization. Each row defines a logic statement based on up to three criteria. For each criterion, the first column specifies the rating or metric and the third column specifies a value. The second column specifies whether the rating or metric must be equal to (=), greater than (>), greater than or equal to (>=), less than (<) or less than or equal to (<=) the specified value.
For example, you might wish to configure the utility to categorize an issue as "High Priority" if the severity rating for the effect is greater than or equal to 8 and the RPN is greater than or equal to 200, as shown below.

To do this, click inside the first column under Criterion 1 and choose Severity from the drop-down list, then click inside the second column and choose >=. Finally, type 8 in the third column. Then, click inside the first column under Criterion 2 and choose RPN from the drop-down list, click inside the second column and choose >= and type 200 in the third column. For this particular logic statement, a third criterion is not required so those columns are left blank.
The Copy Existing button allows you to select another Xfmea library and copy selected settings to replace the ones in the current window.
![]() Clear All clears all entries and selections made in the window.
Clear All clears all entries and selections made in the window.
When you have finished defining the risk ranking logic, click OK to save your changes and close the window.
© 1992-2013. ReliaSoft Corporation. ALL RIGHTS RESERVED.