![]()
![]()
This topic includes the following sections:
Data sheets in most folio types share the same general components. The following figure shows the components of a Weibull++ standard folio data sheet. Note, however, that the data sheet will look different depending on the type of data you selected during setup. The figure shows just one of the many formats. Regardless of the data type, the items discussed in this section, such as the Caption and the Name Box, are identical for all formats.
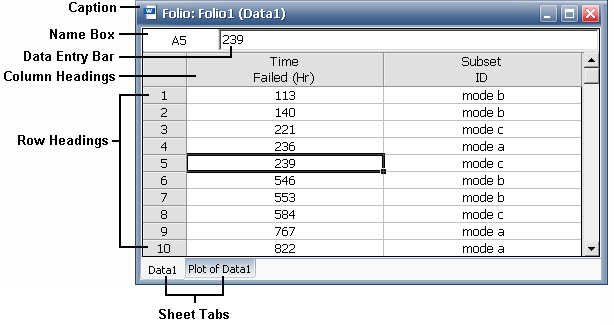
Caption displays the name of the folio and the name of the sheet that is currently displayed.
Name Box displays the location of the currently selected cell by listing the column letter and row number that intersect at the cell’s location. Note that the column letter represents the order of the column as it appears in the data sheet.
Data Entry Bar displays the contents of the selected cell, which may be text, a numerical value or a formula. For text or numerical values, you can enter, or edit, the information directly inside the cell or inside the data entry bar. For a formula, you must use the data entry bar for editing; the cell will display only the calculated value.
Row Headings identify the row numbers. You can change the name or number of a row by double-clicking its heading. The row will still retain its order number in the data sheet.
Column Headings indicate the title for the entries in each column. These titles depend on the type of data you are entering. You can change the name of a column by double-clicking its heading.
Sheet Tabs represent the different sheets within the folio. To switch between sheets, click the appropriate tab. You can change the name of a sheet by double-clicking its tab.
Each standard folio can contain up to 256 data sheets with up to 65,536 data rows per sheet. However, the application’s speed of execution is inversely proportional to the number of data rows in the current data set. In addition, the number of folios that can be opened at once is dependent upon the amount of memory of your system.
To resize the columns, there are three ways:
To resize a single column, point the mouse pointer on the line that borders the column in the column header. The mouse pointer will change to a double-headed arrow. Click and then drag the double-headed arrow to the left or right to resize the column. To save the changes, choose Home > Edit > Format Selection > Column Width Style > Keep as Set by User.
To resize several columns all at once, select a cell in each of the columns to be resized and then choose Home > Edit > Format Selection > Column Width. This opens the Column Width window, which allows you to set the column width of the selected cells and specify a unit of measurement for the width.
To span the columns across the spreadsheet with equal widths, choose Home > Edit > Format Selection > Column Width Style > Span Evenly. To keep the ratio of the column widths to span across the spreadsheet after they have been resized, choose Span Proportionally.
To resize the rows, there are two ways:
To resize a single row, point the mouse pointer on the line that borders the row in the row header. The mouse pointer will change to a double-headed arrow. Click and then drag the double-headed arrow up or down to resize the row.
To resize several rows all at once, select a cell in each of the rows to be resized and then choose Home > Edit > Format Selection > Row Height. This opens the opens the Row Height window, which allows you to set the row height of the selected cells and specify a unit of measurement for the height.
Data sheets allow you to enter formulas in columns that do not require entries to be dates, times or text (e.g., you cannot use formulas in the State F or S column in a Weibull++ standard folio or in the Date Occurred column in an event log folio). For example, if you have a data set where the units were inspected every 24 hours, you can speed up data entry by creating a formula to add 24 hours to the previous inspection time, as shown next.
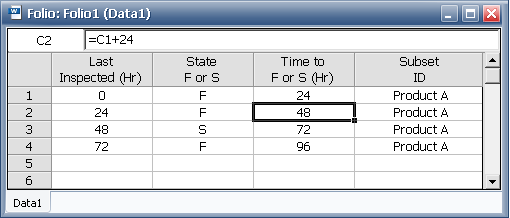
There are two types of cell references (locations) when inputting a formula: absolute and relative. By default, the cell reference is relative, meaning that as a formula is copied and pasted to other cells, the cell references in the formula will be adjusted to reflect the new relative location. In the previous figure, the formula in cell C2 is copied and pasted into cell C4. This changes the cell reference in the formula from “=C1+24” to “=C3+24”; therefore, the time value in C4 is 72+24 = 96.
In contrast, an absolute reference does not change when the formula is copied to other cells. Absolute references are designated by placing a dollar sign ($) in front of the row and/or column to be made absolute. If the formula in the example were rewritten to “=$C$1+24”, then copying the formula to cell C4 would retain the cell reference to C1 and the time value in C4 would result to 24+24 = 48.
© 1992-2013. ReliaSoft Corporation. ALL RIGHTS RESERVED.