![]()
![]()

This topic presents an example of how to use the ALTA Test Plan utility to generate a test plan. The test plan will recommend the stress levels that should be used in a test and the number of units that should be tested at each stress level.
A reliability group in a semiconductor company is planning an accelerated life test for an electronic device. 150 test units will be employed for the test, and the test is planned to last for 600 hours. Temperature and voltage have been determined to be the main factors affecting the reliability of the device, and three chambers are available for testing the units. The goal of the test is to estimate the B10 life (i.e., the time at which unreliability = 10%) of the device under the normal use conditions of 300 K for temperature and 4 V for voltage.
The engineers have determined that the maximum stress values that could be applied during the accelerated life test are temperature = 360 K and maximum voltage = 10 V. Stresses beyond this level would introduce failure modes that do not occur under normal conditions. The product follows a Weibull distribution with beta = 3. Based on their knowledge of the life-stress relationship, the engineers estimate the following probabilities of failure after the product is tested for 600 hours at the different combinations of use level and maximum level stress values:
2% at 300 K and 4 V.
40% at 360 K and 4 V.
90% at 300 K and 10 V.
Follow the steps outlined below to generate a test plan:
Open the Test Plan utility by choosing Insert > Test and Planning > ALTA Test Plan.
Select to design a two-stress test by choosing 2 from the Number of Simultaneous Stresses drop-down list.
Because only three testing chambers are available, three different stress levels will be used for each of the two stress types. Choose 3 Level Optimum Plan from the Test Plan Type drop-down list.
Enter 10 in the BX% Life Estimate Sought field to specify that the test will be used to estimate the B10 life.
Enter 600 in the Available Test Time field.
From the Unit Allocation drop-down list, choose Show Allocations as % and Qty. Then enter 150 in the Number of Units Available field.
Choose Weibull from the Lifetime Distribution drop-down list. Then enter 3 in the Beta field.
In the Stress 1 area, enter the information for the first stress type (i.e., temperature).
Choose Arrhenius from the Life-Stress Relationship drop-down list. This is the life-stress relationship that is typically used for temperature.
Enter 300 in the Use Stress Value field.
Enter 360 in the Maximum Stress Value field.
In the Stress 2 area, enter the information for the second stress type (voltage).
Choose Power from the Life-Stress Relationship drop-down list. This is the life-stress relationship that is typically used for voltage.
Enter 4 in the Use Stress Value field.
Enter 10 in the Maximum Stress Value field.
Enter the estimated probabilities of failure at the end of the test, as shown next.
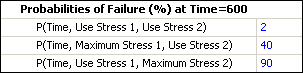
Each probability of failure is a function to time and two stress levels. For example, the value entered in the P(Time, Use Stress 1, Maximum Stress 2) field is the probability of failure at 600 hours (specified in the Available Test Time field), assuming the product experiences the specified use stress level for the first stress (300 K) and the specified maximum stress level for the second stress (10 V). The stress values were entered in the Stress 1 and Stress 2 areas.
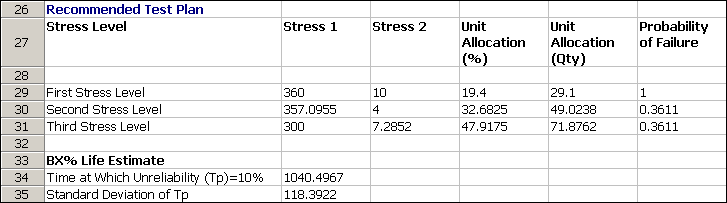
Click the Generate Test Plan button. The Test Plan Results sheet will appear.
The recommended stress levels and unit allocations are displayed under the Recommended Test Plan heading near the bottom of the results sheet. This area of the sheet is shown below. For example, according to this recommendation, the first stress level of the test should be combination of 360 K and 10 V, and about 29 units (or 19.4% of the total number of available units) should be tested at that level.
The reliability group may also wish to evaluate the test plan in relationship to other test goals. For example, the company may desire a test that will estimate the B10 life with 90% confidence and a bounds ratio of 2 or less. The control panel can help you decide whether this can be achieved with the given test plan and with the specified sample size. To use the control panel, follow the steps outlined below.
From the Solve for drop-down list in the Input area of the control panel, select Bounds Ratio.
In the Confidence Level input field, enter 0.90.
In the Sample Size input field, enter 150, which is the total number of units that will be tested, according to the current test plan.
Click the Calculate Result icon inside the control panel to solve for the bounds ratio.
In this example, the bounds ratio is calculated to be 1.3575, which is better than the company's desired ratio of 2. As a result, the engineers may consider using a smaller sample size in order to plan a more efficient test. For example, if they entered 40 in the Sample Size field and then clicked Calculate Result again, the calculated bounds ratio would be 1.8073, which suggests that 40 units may be sufficient for the purposes of the test.
© 1992-2017. HBM Prenscia Inc. ALL RIGHTS RESERVED.
 |
E-mail Link |