
 |
Related Topics: | |
A gate’s timeline consists of its start and due dates, as well as its duration and (if it has one) its specified precedent gate (i.e., the immediately prior gate on the same level). For gates that are first in their level (i.e., with no precedent gate), you can set the start date manually. For all gates you can set the end date and duration manually. All of these properties are defined in the DFR Gate Properties window.
Whenever you change an end date, the software will adjust the duration of the gate automatically. Similarly, when you change the duration, the software will change the gate’s end date automatically.
Below are instructions for common tasks that affect timelines.
IMPORTANT: Because making a change in one location of the hierarchy will often affect all gates below that location, you should review the affected dates in the plan after inserting, removing or moving gates, and after changing any start or due dates.
You can directly edit the start date of any gate that is the first within its level, such as the gates highlighted in the hierarchy shown next.
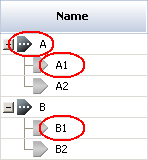
However, for the remaining gates, the start date will be set automatically so it is identical to its precedent's due date. Thus, to change the start date of one of these later gates (A2 and B2 in the above example), you must change the due date or duration of the precedent gate (A1 or B1).
You can manually enter optional planned start/due dates for any gate. If you want to set the planned dates for all the gates simultaneously, choose DFR > Tools > Set Planned Dates. In the window that appears, you can choose to either:
Clear all the planned dates in all the gates.
or
Set the planned start/due dates for all the gates so they are the same as the actual start/due dates.
If there are gaps between dates in your DFR plan (e.g., a top-level gate starts at 1/1/2015, but the first gate underneath it starts at 1/8/2015), you can modify the dates manually to remove the gaps, or you can automatically remove all the gaps by choosing DFR > Tools > Remove Gaps in Dates.
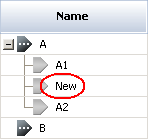
To insert a new gate at a specific location, select a gate in the DFR plan and choose DFR > Gate > Insert Gate. The DFR Gate Properties window will appear so you can define the new gate, which will appear directly above the selected location and on the same level.
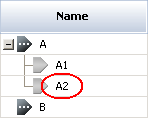
For example, if you select A2 in the hierarchy shown next and choose to insert a gate called “New”:
then the inserted gate will appear in the following location:
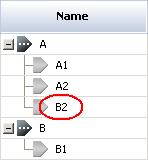
To move a gate to a different location in the DFR plan (i.e., somewhere outside of the gate’s current level), right-click the gate and choose Cut from the submenu that appears. Then right-click a different gate and choose Paste. The copied gate will be pasted into the next level of the selected gate, and it will appear as the last gate in that level.
For example, if you cut gate B2 in the DFR plan shown next:

and paste it into gate A, then the DFR plan will appear as shown next:
To move a gate within the same level, you’ll need to adjust the precedent gate for two of the gates in that level. A gate’s precedent is immediately prior and on the same level. To change a precedent gate, use the drop-down list directly above the Timeline area in the DFR Gate Properties window.

For example, if this is the current order of the gates:

and you want to change the order so A3 comes first and is then followed by A1 and A2, then you should change the precedent gate of A3 to “None” (since there will be no gate both prior to A3 and on the same level), and then change the precedent gate of A1 to “A3”.

© 1992-2015. ReliaSoft Corporation. ALL RIGHTS RESERVED.