
If your "bill of materials" (BOM) files are in Excel or delimited-text format and you want to import only a few fields from the file, you may prefer to use the manual mapping method for creating a BOM import template.
In the following example, you can follow along by using a copy of your own BOM file or by using the sample files that are shipped with the software.
Sample BOM files are available in the example database installed with the software (called "Lambda_Predict19_Examples.rsgz19"). To access this database, choose File > Help, click Open Examples Folder, then browse for the file in the Lambda Predict sub-folder.
The name of the project is "Import Bill of Materials." Note that the examples were designed for the MIL-217 prediction standard. If that standard is not included in your software license you can use any other standard available to you, but keep in mind that only the first eight data fields in the file can be mapped correctly. The rest of the fields may not have appropriate matches in the standard you are working with.
Examine your BOM file and note the order of the columns (Excel file) or the sequence of the fields (delimited text file). You can leave the BOM file open for easy reference.
Create an import templates by choosing Home > Templates > Import Templates. In the Import Template window, use the Standard drop-down list to specify which prediction standard you want to associate with the template. The Available Fields area will display the properties used in the selected standard. (If you are creating a template from within the Import BOM Wizard, the standard type will already be selected.)
Associate each field in the BOM file with a corresponding field in the prediction standard, or specify that the field should be ignored. For example, the following picture shows a template where the fields in the Selected Fields area are arranged in the same order as the column headers in the sample BOM Excel file. It also shows that the data in the 4th column of the BOM file will be excluded from the import process.
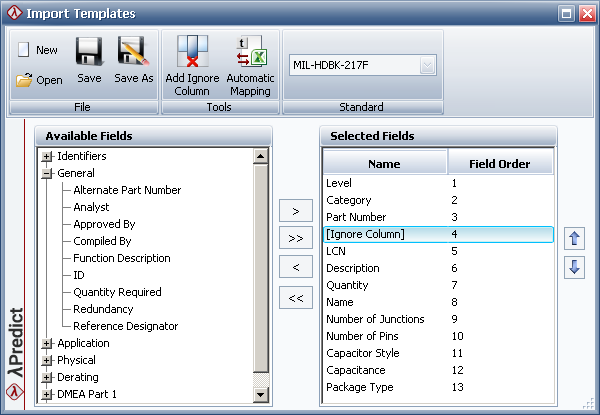
To build this template, select a field in the Available Fields area, and then click the arrow buttons to add it to the Selected Fields area. You can also double-click or drag a field to add it.
To exclude a field from the import process, insert the [Ignore Column] property by clicking the Add Ignore Column icon. You can then drag the [Ignore Column] field to the desired order, or use the arrows to move it up or down one position.
Note that the field names in the BOM file do not have to match the names of their corresponding fields in the prediction standard. The important thing is to make sure that the order of the fields shown in the Selected Fields area matches the order of the fields in the BOM file.
Once you have mapped all the fields in the BOM file, click Save or Save As to save your template so you can use it to import any BOM file that has the same structure.
© 1992-2019. HBM Prenscia Inc. ALL RIGHTS RESERVED.
| E-mail Link |