

Flow groups are resources that are available for use in BlockSim PFS diagrams throughout the project and can be managed via the Resource Manager. A flow group is a set of flow connectors where meeting a threshold within the group can trigger maintenance for one or more blocks or items, either within the group or outside of it. You can use a flow group to trigger a scheduled task (i.e., a preventive task, inspection or on condition task). You can set the task to be performed when flow either reaches/exceeds its threshold or drops to or below its threshold in one or more flow groups. The block(s)/item(s) affected by the task may or may not belong to any of the flow groups. For example, let’s say you have a process train that you know will need regular maintenance, but you want to shut it down for maintenance only if production drops below a certain level. You can create a preventive maintenance task for the components within the train that is triggered by the flow in a flow group dropping below the threshold so that the train only goes down for maintenance once productions is down. See Task Scheduling for more information on how tasks can be scheduled.
Note: When a flow connector belongs to a flow group, the name of the flow group is shown in the connector caption.
The Flow Group window allows you to create, view and edit maintenance groups. It can be accessed from the Flow Groups page of the Resource Manager by choosing Home > Edit > Add, by selecting a flow group and choosing Home > Edit > View or by double-clicking a flow group.
![]()
![]()
At the top of the window, you can specify the flow group name. You can replace the default name with your own name of up to 150 characters, if desired. To change the default names, choose File > Manage Repository > Default Name Formats. (In a secure database, this is available only to users with the "Manage other repository settings" permission.)
![]()
You can also enter comments about the flow group in this window.
For existing resources, the link at the bottom of the window indicates how many times the resource is currently being used. If you need more information, click the link or the icon to open the Dependency Viewer.
![]()
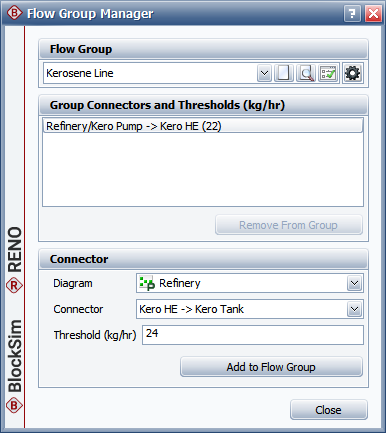
The Flow Group Manager allows you to add connectors to or remove connectors from a flow group, as well as to specify the flow threshold for each included connector. This window can be accessed by choosing Project > Data Management > Flow Group Manager or, when you are viewing the Maintenance Groups page of the Resource Manager, by choosing Home > Selected Resource > Flow Group Manager.
![]()

The Flow Group area allows you to choose an existing flow group from the drop-down list. In addition, you can click the Select Existing icon to open the Select Resource window. If there is not an existing flow group that meets your needs, you can create a new one by clicking the Create New icon to open a window that allows you to specify a name for the new flow group, as well as any comments. Click the View icon to view the characteristics of the selected flow group.
![]()
You can also click the Settings icon to specify the units used for throughput in the flow group’s thresholds.
The Group Connectors and Thresholds area displays all of the flow connectors in the flow group, along with their specified thresholds, in the format [Diagram Name]/[Block Name -> Block Name](Threshold #).
To add a connector to the flow group, you can select the diagram and connector in the Connector area, specify the threshold value and click the Add to Flow Group button.
To update the threshold value for a connector in the flow group, select the connector in the list, specify the new value and click the Update Threshold button.
To view a connector in the flow group, select the connector in the list. It will be selected in the diagram.
To remove a connector from the flow group, select the connector in the list and click the Remove from List button.
© 1992-2019. HBM Prenscia Inc. ALL RIGHTS RESERVED.
| E-mail Link |